Understanding Synology NAS Backup
Synology NAS devices are widely used for their storage capabilities and advanced features. To safeguard your data against hardware failure, natural disasters, or accidental deletions, it is crucial to have a reliable backup solution in place. A backup creates a copy of your data, ensuring that it can be restored in case of any unforeseen circumstances.
Introducing Wasabi Cloud Storage
Wasabi is a cloud storage provider that offers affordable and secure storage solutions. With its competitive pricing and data durability, Wasabi has gained popularity among individuals and businesses alike. By leveraging Wasabi’s cloud infrastructure, you can create an offsite backup of your Synology NAS data, providing an additional layer of protection.
Introducing MultCloud
MultCloud is a comprehensive free cloud file manager that allows you to manage multiple cloud storage providers from a single interface. It simplifies the process of data migration, synchronization, and backup across different cloud services. With MultCloud, you can easily configure a backup task from your Synology NAS to Wasabi, ensuring your data is securely stored in the cloud.
Setting up Wasabi Cloud Storage
Before configuring the backup, you need to set up a Wasabi cloud storage account. Follow these steps:
- Visit the Wasabi website at https://wasabi.com and sign up for an account.
- After creating an account, note down the access key and secret key provided by Wasabi. These will be required during the backup configuration process.
Configuring Synology NAS Backup to Wasabi using MultCloud
Now that you have your Wasabi account ready, it’s time to backup Synology NAS to Wasabi using MultCloud:
- Open the MultCloud website at https://www.multcloud.com and sign in or create a new account.
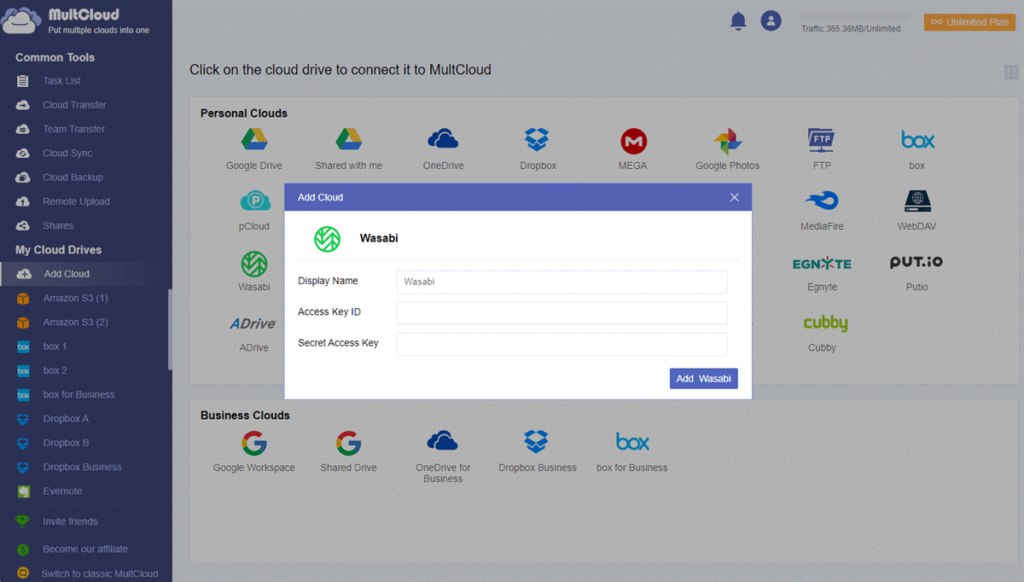
- Once logged in, click on “Add Cloud” and select “Wasabi” from the list of supported cloud storage providers.
- Enter your Wasabi access key and secret key in the respective fields and click “Add Wasabi”.
4. After successfully adding Wasabi, click on “Add Cloud” again, but this time select “NAS” as the cloud storage provider.
5. Enter your Synology NAS credentials and follow the prompts to authorize MultCloud to access your NAS device.

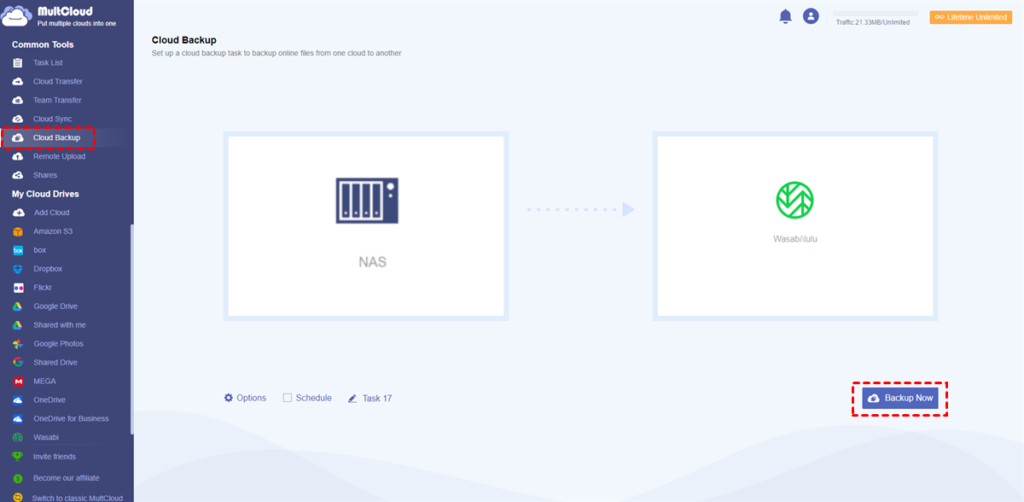
6. Once both Wasabi and Synology NAS are added, click on “Cloud Backup” in the MultCloud interface.
7. Select the source folder on your Synology NAS that you want to back up and choose the destination folder in your Wasabi storage.
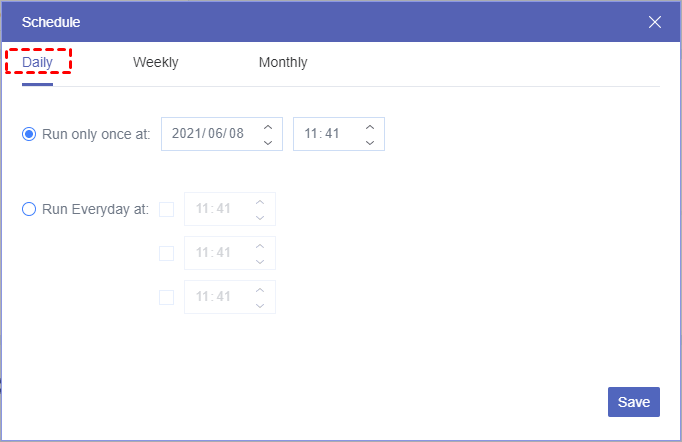
8. Configure the backup settings, such as email notification, schedule, and filtering options, as per your requirements.
9. Click “Backup Now” to initiate the backup process. MultCloud will handle the backup of your data from Synology NAS to Wasabi.
Notes:
- With the steps mentioned above, you can also backup iCloud Photos to Synology NAS.
- “Cloud Transfer” feature can help you easily and quickly transfer files across different cloud accounts, such as Google Drive to S3.
Managing and Monitoring the Backup Process
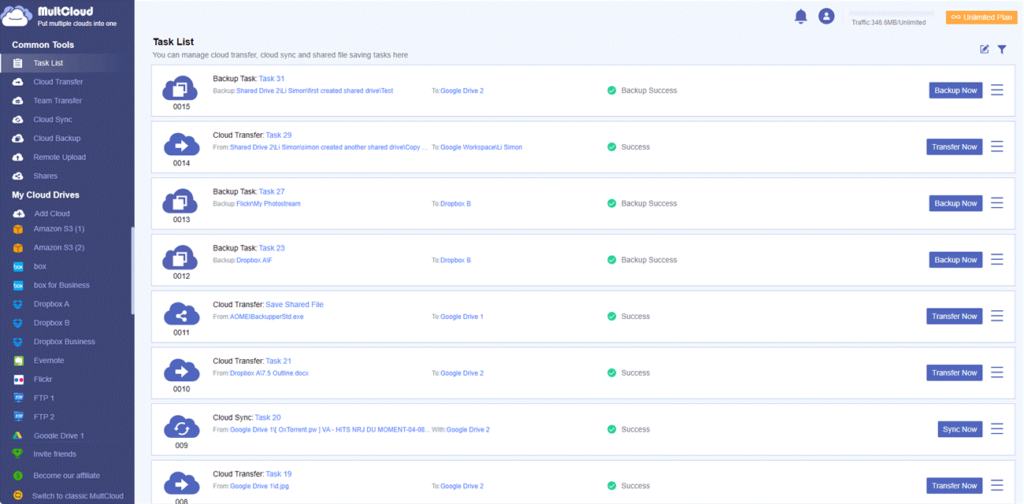
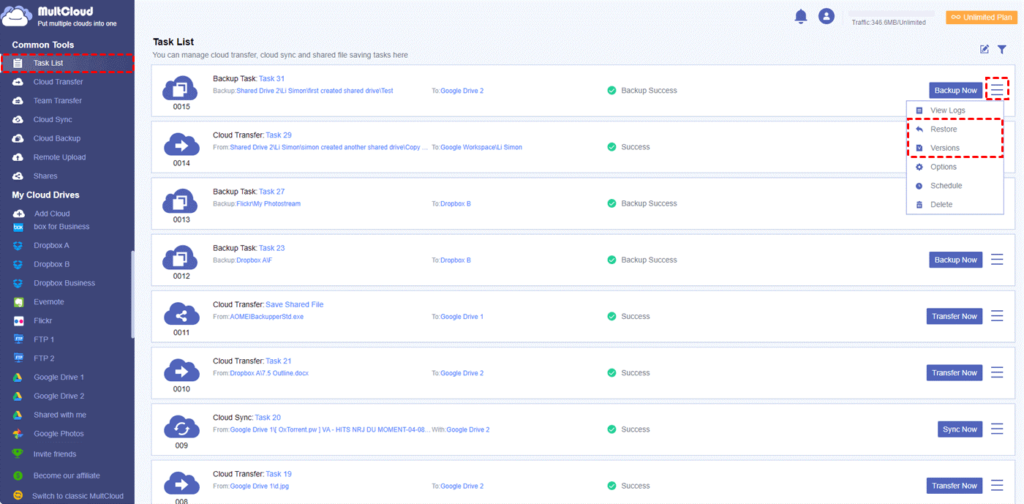
MultCloud provides a user-friendly dashboard where you can manage and monitor your backup tasks. You can view the progress, check for any errors, and pause or resume the backup process as needed. Additionally, MultCloud sends notifications and email alerts to keep you informed about the backup status.
Automating Synology NAS Backup with MultCloud
To streamline the backup process and ensure regular backups, you can set up automatic backup tasks in MultCloud. By scheduling backups at specific intervals, you can eliminate the need for manual intervention and ensure that your data is always up to date in the cloud.
Restoring Data from the Backup
In case you need to restore data from the backup, MultCloud simplifies the process. You can browse your backed-up files and folders within the “Task List” interface and choose the data you want to restore. MultCloud will handle the retrieval and transfer of the selected files back to your Synology NAS.
Ensuring Data Security and Privacy
When dealing with sensitive data, it is crucial to prioritize security and privacy. Both Synology NAS and Wasabi provide robust security measures to protect your data. Ensure that you enable encryption options while configuring the backup process to add an extra layer of security. Additionally, follow best practices such as using strong passwords and regularly updating your NAS firmware and Wasabi access credentials.
Best Practices for Synology NAS Backup to Wasabi
To optimize your backup process and ensure the integrity of your data, consider the following best practices:
- Regularly review and update your backup strategy to accommodate changes in data volume and types.
- Test your backup and restoration process periodically to verify its effectiveness.
- Maintain multiple backups in different locations or cloud providers for added redundancy.
- Implement versioning in your backup strategy to retain historical versions of files.
- Keep track of any changes or updates in Synology NAS firmware or Wasabi configurations to leverage new features and enhancements.
Conclusion
Backing up your Synology NAS to Wasabi using MultCloud provides a reliable and efficient solution for safeguarding your valuable data. By following the steps outlined in this article, you can ensure that your data is securely stored in the cloud and easily recoverable in case of any data loss events. Remember to regularly monitor and update your backup strategy to adapt to changing needs and technologies. If you have cloud-to-cloud sync needs, “Cloud Sync” can help you a lot.